A large raised flower bed can run from a few grow bags grouped on concrete to a layered stone bed built from a kit or stacked stone.
The right choice comes down to how much time you have, what your budget allows, and whether you need something you can take with you when you move.
1. DIY Raised Garden Bed

A DIY raised bed built from lumber lets you size it to the exact gap between your fence and patio, something no kit will do.
I like cedar or a dark stain on pressure-treated 2x12s for a look that reads as furniture, not construction scrap.
Six to eight hours of sun is the hard requirement; shade in the afternoon is fine, but morning sun matters more than you’d think.
Drainage means leaving gaps between boards or drilling holes along the bottom edge, not just hoping the soil breathes.
I fill the bottom third with logs, leaves, or other debris that breaks down; it saves on soil cost and improves drainage over the years.
For the mix itself, bagged raised-bed soil is the easy money, but half topsoil and half compost from a landscape yard cuts the price by more than half if you have a truck or a borrowed one.
This suits someone who wants the bed to last and has a Saturday to cut, level, and screw boards together.
The weight is the real downside: a 4×8 bed full of wet soil does not move, so get the placement right the first time.
2. Galvanized Troughs

Galvanized troughs warm the soil faster in spring and keep it workable later into fall than wood ever will. That metal conductivity is free heat for early lettuce or late kale.
Most stock tanks come waist-high or a little taller, which is deep enough for tomatoes but shallow enough that you are not importing cubic yards of soil.
The drainage is the problem: factory bottoms are solid, so you will need to punch or drill holes, or prop the trough on 4x4s so water exits underneath.
I have seen voles chew through soil to get at roots from below, and a layer of hardware cloth across the bottom stops them cold. That step adds a few dollars and a short break in the afternoon.
A 20-year lifespan with zero rot repair is the real math. For someone renting or planning to move, a trough lifts onto a truck bed intact; a wooden bed stays with the property or becomes demolition.
The look is farmhouse, not cottage garden, so pair it with gravel underfoot rather than trying to soften it with too much surrounding bloom.
3. Vertical Gardening

Vertical gardening is how you flower in a bed that is only wide enough for a walkway on either side.
A trellis mounted to the back of a raised box, or a wall of planters on a garage facade, puts the growth where your eyes already travel.
I run cucumbers on black metal wire against a wooden frame; the fruit hangs clean, away from soil splash, and picking means standing straight.
The same frame in flower would carry Thunbergia alata or a compact clematis like ‘Issey’ for color from July through first frost.
Wall-mounted pockets or a tiered stack of small boxes work when there is no bed at all, just a vertical surface and brackets rated for wet soil weight.
This idea trades ground cover for structure. You will spend money or time on the frame itself, and the soil dries faster in elevated pockets.
It suits the gardener who walks past the site daily with a watering can, not the one who weekends away and trusts rain.
4. Pollinator Flower Bed

A pollinator bed justifies itself even if your own taste in flowers runs plain.
Zinnias in a cut-and-come-again mix bring the color you see from the window; cornflower and salvia bring the butterflies and hummingbirds you did not know you were missing.
Succession is what makes it work: early bloom, mid-season, and late so something is always offering nectar.
Flat-headed sedum feeds short-tongued bees; tubular honeywort handles the long-tongued specialists. I aim for at least three flower shapes in a bed so no insect category is shut out.
Native plants to your county matter more than native to your state; a local nursery that propagates from regional stock beats a generic "pollinator mix" every time.
This suits the gardener who will tolerate some chewed leaves and untidy seed heads in exchange for motion and sound. If you spray for anything, the whole purpose collapses; this is the bed you commit to organic from day one.
5. Unique Edging

Edging is the line that tells your eye the bed is intentional, not a lawn disease.
I have cut a clean curve with a half-moon edger and left it bare soil; I have also buried brick on end for a shadow line that disappears under iris leaves.
The choice depends on whether you mow right up to the bed or need a barrier against grass runners.
Stone is permanent and priced by the pallet; wood rots but takes a mallet adjustment if your curve was optimistic.
Lavender or golden marjoram as a living edge gives scent when you brush past, though it asks for full sun and soil that drains same-day after rain.
For heavy clay, stick to hard material; for sand, a planted edge stabilizes what would otherwise drift.
This is the entry point project: an afternoon, a trip to the lumber yard or stone yard, and the result changes how the whole yard reads.
Do it first if your raised bed still looks like a construction site against unmowed lawn.
6. Raised Flower Bed with Trellis

A trellis built into the bed frame itself, not leaned against it later, handles the load of mature vines without pulling screws from rotted wood.
I place the trellis on the north side so it does not shade shorter plants. Wood, bamboo, or PVC pipe all work; string is the cheap experiment, replaced each season.
Beans, cucumbers, or melons climb by tendril and need no tying; morning glory and clematis want some guidance early.
Half your bed’s length becomes vertical real estate. For a standard box, that means planning the front slice for bush varieties and the back length for climbers.
This suits the gardener who wants privacy from a neighbor’s window or the visual weight to anchor a long, sloping yard.
7. Cottage Garden Style

A cottage garden bed is less about construction and more about the planting philosophy: cram it full, let things spill over, and stop worrying about straight lines.
Roses, hollyhocks, and geraniums form the backbone, though lavender and aquilegia fill the gaps between bloom times.
I would go with soft pastels for a small front space where you want to calm things down; brights like orange geum or red achillea work better when the bed sits against a plain fence that needs waking up.
Curving the path helps, since straight gravel reads modern and fights the whole mood. Annuals such as nigella or calendula plug bare spots cheaply if you sow them yourself.
8. Use Grow Bags, Pots, or Other Small Containers

Grow bags and pots let you fake a flower bed anywhere the sun hits: balcony, driveway, even a wide windowsill. Grouping enough of them lets the eye read one mass rather than scattered singles.
I mix clay with textured finishes and odd colors, though I keep drainage holes non-negotiable; waterlogged roots kill more container plants than anything else.
A single large planter, stone-textured and round, anchors a patio corner faster than three small pots fighting for attention. For anyone with no soil to dig in, this is the fastest weekend project on the list.
An old wheelbarrow drilled for drainage adds cottage charm if your space already leans that way.
9. Layered Flower Bed

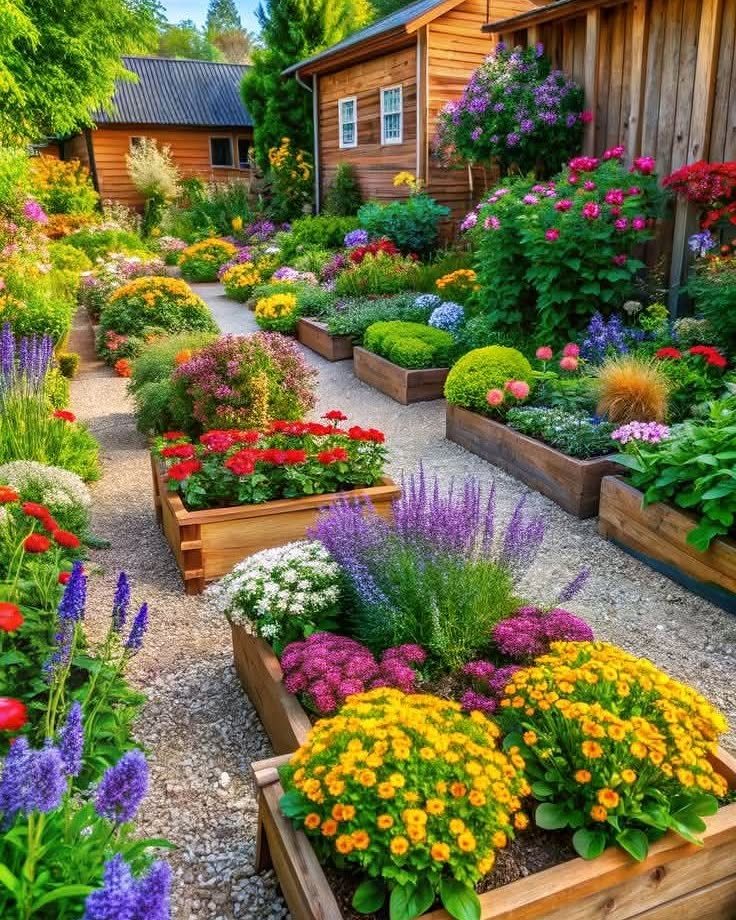
Layering is the oldest stage trick in gardening: tall plants in back, mid-height in the middle, ground cover up front, so every bloom gets seen.
A curved stone path shows why this works; the bed wraps around the viewer and the height steps draw the eye along.
I use contrasting colors when I want boldness, or stick to one color in shifting shades for something quieter. Ornamental grasses and slender shrubs fill the top layer without demanding constant deadheading.
The main cost here is patience, since a full look needs 2–3 growing seasons to knit together. Start with larger nursery pots in back if you want impact this year.
10. Raised Bed Kits

Raised bed kits ship with every joint pre-cut and hardware included; you unpack, align, and screw. Materials run from cedar to composite to aluminum, and a clear cover turns the same frame into a cold frame for starting early.
I would point anyone without a saw or a drill toward these, since buying tools for one bed often costs more than the kit itself.
You lose some flexibility on dimensions; you build what the manufacturer shipped, not what fit your odd corner. For a renter wanting to take it along, the lighter aluminum frames come apart and move.
Choosing Materials for Raised Beds
Cedar is the wood I would pick if I wanted the bed to last without asking much of me. It costs more than pressure-treated pine up front, but the replacement math favors it by year 8 or 9.
Galvanized steel and brick sit at the other end of the look spectrum. Steel warms early and stays clean-lined; brick reads permanent and pairs with older house styles without trying.
Both need drainage thought through at the start, holes in steel, or a gap in the brick course.
I would skip any wood rated for ground contact that carries a chemical treatment label. The leach question is settled enough that I do not gamble with it near food or where kids dig.
Reclaimed brick or terracotta tile from a salvage yard gives color variation no new material matches. Two or three tones is the limit though; more than that and the eye reads clutter instead of pattern.
Tips for Successful Flower Beds
Soil preparation starts with turning the top few inches and breaking up clumps. I add compost or a balanced fertilizer then, not after plants are in and roots are disturbed.
Plant choice comes next, and the hard filter is what survives your actual light and your actual winter low.
A nursery down the road propagates from stock that already tolerates your specific clay or drought, which beats ordering something barely native to your whole state.
Seasonality means checking bloom times on the tag and picking for gaps. Evergreens carry structure in January; annuals plug color in July when perennials pause.
Mulch goes on last, 2–3 inches, to slow evaporation and block weed seed germination.
Maintaining Raised Beds
Weeding is weekly in spring, monthly by midsummer once the mulch layer has done its work against new seed. I pull before flowering so the weed bank does not refresh itself.
Mulch needs replenishing once a year, usually in late fall after cleanup. Shredded bark or straw both work; I avoid dyed products that stain soil and hands alike.
Drainage problems show up as yellow lower leaves or soil that smells sour.
If water stands more than a few hours after heavy rain, the bed needs more bottom gaps, a French drain, or a switch to containers on that spot.
Irrigation options run from soaker hose, which I bury under mulch, to drip line with emitters spaced to root zones. Timer systems pay off if travel is common; hand watering is fine for a small bed you pass daily.
Designing for Accessibility
Paths between beds need enough width for a wheelbarrow, and more again if you want to turn a garden cart or pass with a loaded bucket. Gravel or compacted decomposed granite both shed water and carry weight without rutting.
Trellises built into the bed frame handle the load without leaning or pulling screws loose, which is why I frame them in from the start instead of bolting something on later.
I put them on the north edge so the climbers throw their shade out into the yard, not back onto the bed behind them.
A frame of wood or PVC pipe, with wire or string for the plant to grip, turns half the bed’s length into vertical growing space. That matters when ground area is small but height is free.
Raised beds offer improved drainage, airflow, and soil-quality customization," says Kat Aul Cervoni, a landscape designer and founder of the firm Staghorn NYC.
Frequently Asked Questions
Is it cheaper to build a raised bed or buy one?
Building your own usually costs less, especially if you already own a saw and drill. Buying those tools for one bed often runs higher than a kit price.
What should you put in the bottom of a raised flower bed?
Logs, leaves, or other debris that breaks down fill the bottom third; it saves on soil cost and improves drainage over the years.
Metal stock tanks come with a solid floor, which keeps gophers out but traps water if you are not careful.
I have seen beds rot out from standing water; a few half-inch holes drilled through the bottom, spaced every foot or so, handle drainage without inviting rodents up through openings large enough for a fist.
What is the layout of a raised bed flower garden?
Layer plants by height so every bloom gets seen: tall in back, mid-height in the middle, ground cover up front. Accessibility matters; leave walkway space on both sides or plan to reach the center from the edges.