These ideas run from a free tin can up to a house number box, and the one that fits depends on whether you own your walls or just hang things on them.
Renters here get fabric pots they can carry through a narrow doorway; first-home owners get cinder block beds that stay put in a windstorm and stacked towers that tip if one side dries faster.
The concrete planter fake starts with a plastic serving bowl roughed up by sandpaper, not a mold and a bag of mix.
1. Thriller, Filler & Spiller

A thriller, filler, and spiller in one pot gives the layered look of a professional arrangement without the professional price. The thriller goes in the center or back: something tall like salvia or a grass that draws the eye upward.
Fillers mound around it, petunias or million bells that cover soil and bridge the height gap. Spillers soften the rim, sweet potato vine or bacopa that trail down the sides.
Read the tags before you buy. A plant that wants to spread wide will swallow a thriller meant to stand alone, and a shade-loving filler bakes in afternoon sun against a south wall.
Three plant types, one pot, one season of fullness.
2. DIY Outdoor Wall Planters

Bare walls waste growing space that a renter can’t expand and a first-home owner hasn’t fenced yet. Wall-mounted planters turn vertical siding or a narrow balcony rail into garden real estate.
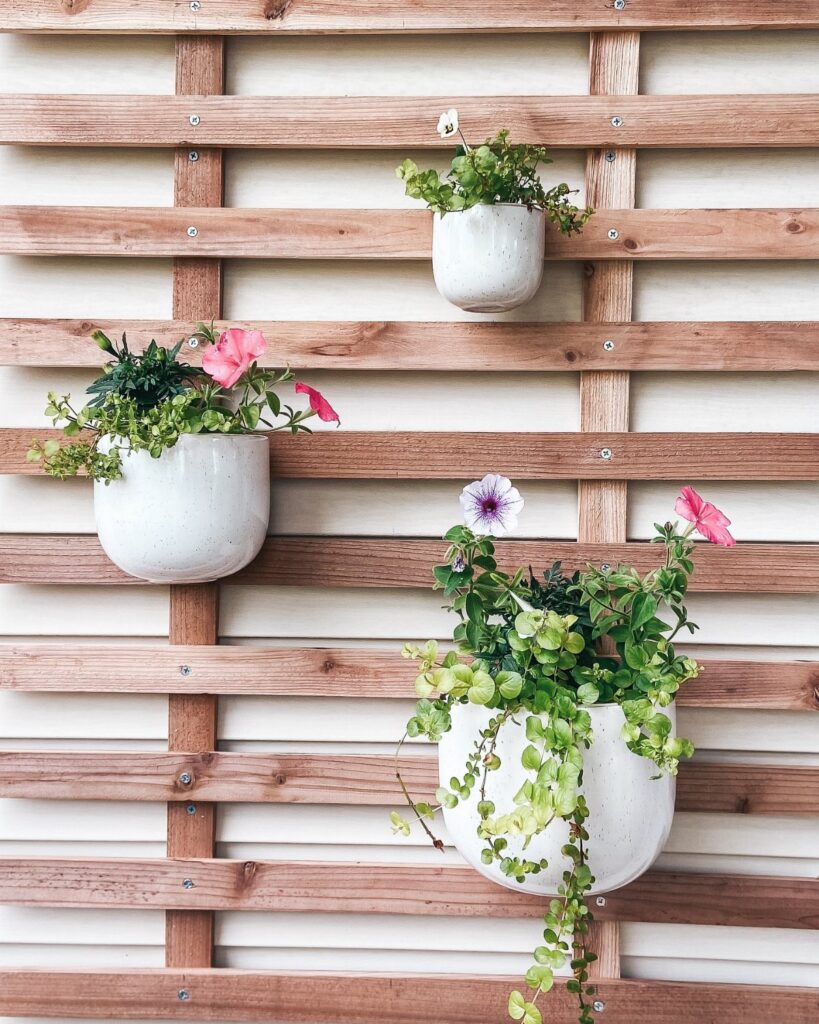
Ceramic pots on a slatted wood backboard keep the look clean and let you swap plants without rebuilding. Paint the backboard bold if the wall is neutral; keep it raw wood if the pots themselves carry color.
The slats drain air and water, which matters more than it looks: trapped moisture behind a planter rots siding in two seasons.
I’d skip the permanent install if you’re renting. French cleats or sturdy hooks let you take the whole assembly when you move.
3. Use Baskets as Pot Covers

Wicker, seagrass, or wire baskets read warmer than plastic nursery pots, and most of us own a few too many already. Planting directly in a basket is asking for rot and a mess on your shelf.
Basket fiber wicks water outward, dries in hours, and rots in weeks.
Spray paint handles the color change: semi-flat black over flea-market wicker looks intentional, not repurposed.
Check the base before you set it down. A damp basket on a wood deck leaves a stain that outlasts the plant.
4. DIY Hanging Planters

Floor space runs out fast on a porch or a patio the size of a parking spot. Hanging planters grow upward instead, and a log-slice base keeps the rustic side of DIY without looking like a craft fair.
Rope through drilled holes carries the weight; use a hardwood slice, not soft pine, or the wood cracks under wet soil in a season.
The tradescantia trailing down handles lower light than most flowering options, so this setup suits a covered porch where sun hits sideways for a few hours, not overhead all day.
A hoop planter in painted metal reads more modern if your house leans that way. Either way, water weight matters: wet soil in a standard pot hits hard before you even add the plant.
Anchor to structure, not siding.
5. Smart Small-Space Planters

Small-space planters suit the windowsill gardener who wants herbs within arm’s reach of the stove, not a backyard overhaul.
The egg-shaped pair keeps the footprint tiny and the personality large; robot-face planters turn a small pot into something you actually notice.
A 5-tier vertical tower does more production in the same square inches if you’re growing food, but the character planters win for a desk, a bathroom shelf, or a gift that doesn’t read "I couldn’t think of anything."
Mint in the yellow one, maybe lavender in purple: herbs that tolerate the dry air of heated rooms better than basil or cilantro.
Water carefully. Small pots dry to dust in a day of direct sun and drown in a saucer left standing.
6. Stacked Flower Pots

Stacked pots build height from the ground up, which matters when you own one planter’s worth of space and want the impact of three.
A hexagonal set uses descending sizes, largest on bottom, smallest on top, with soil and root ball filling the gaps between.
Sweet potato vine trails from the base layer, calibrachoa spills from the middle, and salvia stands upright on top. Lobelia or alyssum in the second tier fills without trailing too far.
Tuck each plant slightly toward the outer edge; gravity does the rest as they settle in.
Plastic pots inside the clay ones carry the structural load and keep the stack from sinking unevenly.
I’d build this in place: a full tower of wet soil weighs more than it looks, and the hexagonal shape tips easier than round if one side dries faster.
7. Vintage Container Planters

An old enamel canister with faded lettering and a few dings beats a store-bought pot for character you cannot fake.
I look for these at estate sales and flea markets, the kind with lids that no longer seal tight, which makes them perfect for succulents that want drainage more than they want depth.
The original finish is half the point, so I drill holes in the bottom rather than painting over the wear. A layer of gravel under the soil keeps roots from sitting wet.
Small canisters work for single echeverias; larger ones handle stacked arrangements.
This suits renters who want plants that read as decor, not clutter. Weight matters more than people expect: a big ceramic piece is not moving once it is full of soil, so pick its spot before you fill it.
8. DIY Concrete Planters

Concrete planters look sharp against grey tile or pale siding, but the real ones run heavy and pricey.
I have had luck faking the look with plastic serving bowls and concrete spray paint, which keeps the weight down enough to hang on a standard wall anchor.
Texture is what separates the handmade look from a poured slab. The paint reads as real concrete only if the bowl already has some grain to it; smooth plastic stays obvious.
I rough up the surface with sandpaper first, then build the paint in thin coats so it does not pool.
Two or three bowls nested together, each an inch smaller than the last, give you a set that looks planned rather than random.
This works best for covered patios where the paint will not take daily sun and rain. For full exposure, spend the money on real concrete or plan to touch up every season.
9. Painted Cinder Block Planters

Cinder blocks are ugly until you stop fighting them. Paint them in colors that read as intentional, not apologetic, and they become garden architecture for the cost of the block plus a half-pint of exterior paint.
I like stencils for the pattern work because tape bleeds on that rough surface, and freehand never ends up as neat as I picture it.
Stack them two high for a raised bed that does not require bending, or run a single course as a border that keeps mint from taking over the yard.
The holes are already there for planting; I fill them with potting mix rather than garden soil, which compacts too tight in that small space.
The weight is the feature, not the bug. These stay put in wind that would send plastic pots rolling down the street.
I would not use them on a deck without checking the load rating first, but for ground-level beds they are hard to beat for the money.
10. DIY Fabric Planter

Fabric planters started showing up in garden centers a few years back, and I was skeptical until I tried one. The woven material breathes better than plastic, which means roots do not circle and water does not sour.
The ones I have seen in pink and orange read as modern in a way terracotta does not, though neutral colors fade into a green garden faster.
You can sew simple versions from landscape fabric or heavy canvas, folded into a box and stapled to a wooden base. Thickness matters: thin fabric collapses when wet, so I double-layer or buy the stiffened commercial grade.
These suit renters who need to haul plants indoors for winter. A fabric pot weighs almost nothing empty, and the soft sides let you squeeze it through a narrow doorway.
The downside is lifespan; even the good ones start fraying eventually in full sun, and the cheap ones may not last a single season.
11. Grow Strawberries in a Hanging Basket

Strawberries in a hanging basket solve two problems at once: they stay off the ground where slugs cannot reach them, and they turn a blank porch corner into something productive.
I choose everbearing varieties bred for containers, which fruit all summer rather than one heavy flush in June.
The basket itself matters more than I expected. I line mine with coconut coir, which holds moisture without drowning roots, and I add a small reservoir in the bottom if the basket design allows it.
Hanging baskets dry out fast in July, and strawberries will crisp up before tomatoes show stress.
A basket that size handles a few plants, enough for a handful of berries every few days without crowding the roots.
This is not the setup for someone who wants to make jam, but for eating out of hand while watering the rest of the garden, it earns its spot.
I hang mine at eye level where I will notice the fruit before the birds do.
12. DIY House Number Planter

A house number planter mounts beside the door where a wreath would go, except it stays alive. The best versions are vertical boxes in black or natural wood, with the numbers lit from behind and succulents filling the face.
The look is clean enough for modern houses and warm enough for bungalows.
Succulents work here because they tolerate the reflected heat off a wall and do not mind the shallow soil. I would plant sedums and small echeverias, spaced tight so the box reads as green texture rather than individual plants.
A backing board with a slight tilt sheds rainwater away from the door.
This project needs a drill and a level, plus comfort with basic wiring if you want the numbers lit. For renters, it is probably not worth the holes in the siding.
For a first home, it is the kind of weekend project that still looks professional from the street.
13. DIY Decorative Tin Can Planters

Tin cans left from dinner become planters with a napkin from the craft drawer and a little time on a weeknight. The technique is decoupage: brush Mod Podge onto the can, press the napkin flat, seal another coat on top.
I like napkins over paint because the pattern is already there and the paper softens the metallic look.
Twine handles let you hang them from a curtain rod or a porch rail. Drill drainage holes in the bottom first, or keep the plants in their nursery pots inside the can so water does not pool.
This suits renters who cannot mount heavy brackets and anyone with a windowsill that needs color without the cost of ceramic. The catch with cans is size: one holds a single geranium or a cluster of herbs, not a tomato.
Choosing the Right Plants
Sunlight and water needs have to match, or the arrangement falls apart in weeks.
A pot that bakes on a south wall needs plants that can take the heat together, not one drought-tolerant succulent paired with a fern that wants damp shade. I read the tags and group by light requirement first, color second.
Color works two ways. Sometimes one plant with an unusual bloom sets the whole palette; other years I run the same shade across every pot on the porch for cohesion.
Texture matters as much as hue. Glossy leaves against fuzzy ones, fine foliage beside broad, give the eye more to do than color alone.
Container Care
Pots dry out faster than ground beds, sometimes in a single hot afternoon. I check mine daily in July, not on a schedule but by weight; a light pot needs water now, a heavy one can wait.
Saucers help on a wood deck, but I empty them after an hour so roots do not sit wet.
Feeding keeps the color coming. Slow-release granules at planting time handle the first month, then the liquid takes over.
Soil and Drainage
Garden soil is too dense for pots. It compacts, water sits, roots suffocate.
I use bagged potting mix, the light and airy kind that lets roots spread without fighting.
Miracle-Gro Potting Soil With Moisture Control and Espoma Organic Potting Mix are both widely available; I have used both and they do what the bag says.
Drainage holes are not optional. Without them, a layer of gravel in the bottom becomes a swimming pool with a false floor.
I drill my own if the container comes solid, and I check that water actually runs out the first time I water. If it pools on top, the hole is clogged or the soil is wrong.
Choose a pot large enough to give roots room to grow and hold moisture — usually at least 12 inches wide for most flowers or veggies. Bigger pots dry out more slowly and are more forgiving for beginners.
Planting Techniques
The thriller, filler, and spiller method works because it copies how plants compete in nature for light and space. The thriller claims the vertical real estate first.
I place it slightly off-center in a pot that will be viewed from one side, dead center if the pot sits in the round.
Fillers go in next, spaced to mound but not crowd. I leave more room than the nursery tag suggests; a small starter looks fine in May and swallows its neighbors by July.
Spillers last, tucked at the rim where gravity can pull them down. I angle the root ball slightly outward so the plant starts trailing rather than growing upright.
Water once, let it settle, then tuck more soil anywhere the water exposed a gap. The first week, I check daily; new roots dry fast in loose mix.
Frequently Asked Questions
What are some DIY ideas for plant pots?
Vintage enamel canisters, stacked clay pots, and tin cans with decoupage napkins all work well. I like canisters with worn original finish for succulents, and nested concrete-painted bowls keep the weight light enough to hang.
Baskets as pot covers warm up plastic nursery pots, though planting directly in one invites rot.
What are some good ideas for planting plants in pots?
The thriller, filler, and spiller method gives a layered look without professional cost. Salvia or grass stands tall in back, petunias or million bells mound in the middle, and sweet potato vine or bacopa trails over the rim.
Read the tags first: a shade-loving filler against a south wall bakes by July.
What are some creative DIY outdoor planter ideas?
Painted cinder blocks become garden architecture for the cost of a half-pint of exterior paint, and the holes are already there for planting. Slatted wood backboards with wall-mounted ceramic pots turn bare siding into growing space.
For something lighter, fabric planters in bright colors read modern and haul indoors for winter.
What are some things I can use as plant pots?
Tin cans, wicker baskets, vintage canisters, and even painted cinder blocks work. Baskets and cans work best as sleeves; keep the plant in its nursery pot inside so water drains through instead of pooling.
Old enamel canisters with failed lids suit succulents perfectly once you drill drainage holes.